Hello dear friend/ Hej venner,
First og all, thanks so much for all the sweet comments on my last entry here, it means sooo much to me.
Først vil jeg gerne sige tusinfd tak for alle de søde kommentarer, jeg har fået på mit sidste indlæg herinde, det betyder virkelig meget.
I have promissed some Danish girls, that I would show , how I make my candles with either stamped images or napkinimages on, so I´ve made a little phototurial here for you all, which I hope, you´ll enjoy and find usable. So here it comes:
Jeg har lovet et nogle danske piger, at jeg ville vise dem, hvordan jeg laver mine lys med stemplede billeder eller servietbilleder på, så jeg har lavet en lille foto tut her, på hvordan jeg gør det, som jeg håber, I kan bruge til noget. Så her kommer den:
 First a pic of all you need to make it.
Først et billede af de ting, som skal bruges for at lave dem.
 Here´s some images, that I´ve cut out of some napkins, and you don´t need to cut them too close to the image, as the edge wount show that clear.
Her er det nogle billeder, som er klippet ud af servietter. I behøver ikke klippe helt int il, da kanten ikke blir så kendt.
 BUT make sure that you ONLY use the very top layer and peel the rest of and throw away.
MEN sørg for at I får skilt alle lagene ad og KUN bruger det lag med billedet på.
 Here it´s different stamps, I have stamped on very thin silk paper and then colored, but you can do just as you like, and you can also just print in the silkpaper, if you like, that´s all up to you.
Her har jeg stemplet forskellige stempler på silkepapir og farvelagt, men det kan man gøre som man vil, og man kan også bare printe noget ud på silkepapiret, men så skal man nok lige sætte det fast på et stykke papir først for at få det gennem printeren.
 Some images close up, and again, you don´t need to cut too close, as here the edge can´t be seen at all on the silk paper.
Her nogle billeder tæt på, og igen I behøver ikke at klippe dem helt tæt ind til, da man overhovedet ikke kan se silkepapiret på lyset, når det er lavet.
 Or you can just stamp some sentiments to use too.
Eller man kan stemple tekster og bruge i stedet for, hvis man ikke er så glad for at stemple eller farve.
 Here I´ve taken a long piece of bakingpaperto hold the image on the candle, while I´m heating it. You can also use waxpaper, but the bakingpaper is a bit stronger, as you have to hold it pretty tight.
Her har jeg taget et langt stykke bagepapir og foldet, til at holde billederne på plads på lyset, mens jeg varmer dem. Man kan også bruge vokspapir, men bagepapir er noget stærkere, da man skal holde ret stramt, mens man varmer det.
 Place your different images, where you want them, to find out where they all looks best, sotry font and back before setting anything in place just to be sure.
Placer dine billeder på lyset, hvor du vil ha dem, men prøv dig lidt frem før du sætter noget fast, da de ikke kan flyttes overhovedet så snart du har varmet på det, så vær sikker før du går igang.
 Once you know exactly where you want everything, you take them one at a time and place on the candle, and then you wrap the bakingpaper really tight around it, to make sure it stays, where it should and to keep it totally flat on the candle.
Når du ved nøjagtigt, hvor de skal være, ta´r du dem en af gangen og sætter dem på plads og sætter bagepapiret stramt rundt om til at holde dem på plads og holde dit billede helt fladt mod lyset.
 Here it is all wrapped ready to heat on now.
Her er detpakket op, helt klar til at begynde og varme på.
 And then you just heat it with the heatgun for a few minutes, while you keep moving the heat tool around all the time, so the candle wount melt. Keep the heatgun about 10 to 15 cm over the cande.
Og så varmer du ellers bare på billedet gennem bagepapiret i et par minutter, mens du hele tiden bevæger varmepistolem rundt, så du ikke smelter lyset på et sted. Hold varmepistolem ca. 10 til 15 cm over lyset, mens du arbejder.

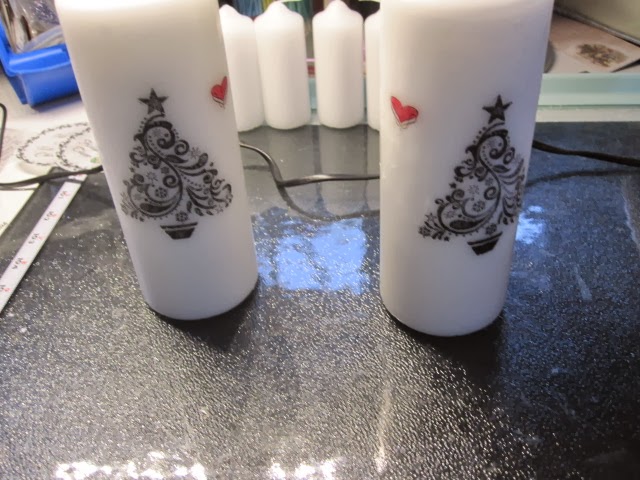 Here´s one side of the candles with stamped images on.
Her er den ene side med de stemplede billeder.
 And the other side.
Og her den anden side.

 And here´s the first side with the napkins on
Og her er den første side af dem, der er brugt servietter på.
 And the other side.
Og her den anden side.
Now you´re ready to begin to decorate your candles further, and on the following pictures you can see some different things, that I´ve chosen to use for mine, but it´s only your own imagination, that sets the limits here. Just always think about, it is candles, so it has to be something, that wount burn, or at least make sure the reciever knows, they need to be careful with it then.
Nu er I så klar til at begynde at dekorere lysene yderligere, og på de næste billeder kan I se, hvad jeg har valgt at bruge til mine, men her er det kun fantasien, der sætter grænserne. Bare altid husk på, at det er levende lys, så det skal helst være noget, der ikke lige brænder, hvis uheldet er ude, eller i hvert fald gør modtageren opmærksom på at der er noget, som kan brænde så.
 This is a metalplate, that I have curved over a finger to make it fit for the candle.
Her er det en metalplade, som jeg har buet hen over et par fingre, for at tilpasse det lysets kurver.
 And here´s a metalband, and some brads, that I use to attach the band to the candle.
Og her er det et metalbånd, som jeg har brugt og nogle brads, som jeg bruger til at sætte båndet fast til lyset med.
 And here´s both sets of candles all done.
Og her er så begge sæt lys færdige.
 The big set with stamps close up.
De store lys med stempelbilleder tæt på.

 And here real close / Og her virkelig tæt på
 Here I had some brads made like a mitten. / Her nogle brads jeg havde lavet som vanter.
 And the small candles with napkins on / Og her de små lys med servietter på.
 The other side of these / Den anden side af de her.
 And here I´ve used a ribbon all at the bpottom and a ribbonbrd to gather it and attach it to the candle.
Og her har jeg brugt bånd og en båndbrad til at samle enderne og sætte det fast på lyser.

 Look here you can´t seee where it´s been cut out at all anymore.
I kan se her, at man slet ikke kan se kanterne, hvor billedet er klippet ud mere efter det er sat på.
 And here the stamped images. / Og her ser I de stemplede billeder også.
 And very close up. / Og her meget tæt på.
 And here they finally all are completely done and ready to wrap as a gift to someone.
You can either make a nice box, that´ll fit exactly for these r you can wrap it up in some cellofane and close it with a nice ribbon and beautiful bow at the top. I most time makes a nice box for them, but that I can maybe show another time thoug.
Og her er de så alle fuldstændig færdige og klar til at blive pakket pænt ind til en gave til en eller anden. Du kan enten lave en flot æske, som passer lige til lysene, eller du kan pakke dem ind i cellofan og binde det med et flot bånd og sløjfe i toppen. Jeg laver for det meste en flot æske, der lige passer til lysene, men det kan vi måske tage en anden gang.
I hope, you´ve enjoyed my little tutorial here and it´s useful for some of you. If you have any improvements for it or just something, that can be done easier maybe, then I´ll love to hear from you, and ofcause also if you make anything from this, I would also love to hear and see it.
Jeg håber, I alle har nydt min lille tutorial her, og at det i hvert fald har været til glæde for nogen. Hvis I har nogle ting, som kan forbedres eller bare noget, som kan gøres nemmere, så hører jeg selvfølgelig meget gerne fra jer, og selvfølgelig også, hvis I laver noget efter den, vil jeg gerne både høre og se om det.
Have a wonderful day everyone and lots of fun making candles here now. Take good care of yourself and have a great week-end til we meet again.
Há en rigtig god dag allesammenog forhåbentlig en masse sjov med at lave lys nu. Pas godt på jer selv, og há en rigtig god week-end til vi ses igen.
Biiiiiig hugs / Knuuuzer
Maryann
First og all, thanks so much for all the sweet comments on my last entry here, it means sooo much to me.
Først vil jeg gerne sige tusinfd tak for alle de søde kommentarer, jeg har fået på mit sidste indlæg herinde, det betyder virkelig meget.
I have promissed some Danish girls, that I would show , how I make my candles with either stamped images or napkinimages on, so I´ve made a little phototurial here for you all, which I hope, you´ll enjoy and find usable. So here it comes:
Jeg har lovet et nogle danske piger, at jeg ville vise dem, hvordan jeg laver mine lys med stemplede billeder eller servietbilleder på, så jeg har lavet en lille foto tut her, på hvordan jeg gør det, som jeg håber, I kan bruge til noget. Så her kommer den:
Først et billede af de ting, som skal bruges for at lave dem.
Her er det nogle billeder, som er klippet ud af servietter. I behøver ikke klippe helt int il, da kanten ikke blir så kendt.
MEN sørg for at I får skilt alle lagene ad og KUN bruger det lag med billedet på.
Her har jeg stemplet forskellige stempler på silkepapir og farvelagt, men det kan man gøre som man vil, og man kan også bare printe noget ud på silkepapiret, men så skal man nok lige sætte det fast på et stykke papir først for at få det gennem printeren.
Her nogle billeder tæt på, og igen I behøver ikke at klippe dem helt tæt ind til, da man overhovedet ikke kan se silkepapiret på lyset, når det er lavet.
Eller man kan stemple tekster og bruge i stedet for, hvis man ikke er så glad for at stemple eller farve.
Her har jeg taget et langt stykke bagepapir og foldet, til at holde billederne på plads på lyset, mens jeg varmer dem. Man kan også bruge vokspapir, men bagepapir er noget stærkere, da man skal holde ret stramt, mens man varmer det.
Placer dine billeder på lyset, hvor du vil ha dem, men prøv dig lidt frem før du sætter noget fast, da de ikke kan flyttes overhovedet så snart du har varmet på det, så vær sikker før du går igang.
Når du ved nøjagtigt, hvor de skal være, ta´r du dem en af gangen og sætter dem på plads og sætter bagepapiret stramt rundt om til at holde dem på plads og holde dit billede helt fladt mod lyset.
Her er detpakket op, helt klar til at begynde og varme på.
Og så varmer du ellers bare på billedet gennem bagepapiret i et par minutter, mens du hele tiden bevæger varmepistolem rundt, så du ikke smelter lyset på et sted. Hold varmepistolem ca. 10 til 15 cm over lyset, mens du arbejder.
Her er den ene side med de stemplede billeder.
Og her den anden side.
Og her er den første side af dem, der er brugt servietter på.
Og her den anden side.
Now you´re ready to begin to decorate your candles further, and on the following pictures you can see some different things, that I´ve chosen to use for mine, but it´s only your own imagination, that sets the limits here. Just always think about, it is candles, so it has to be something, that wount burn, or at least make sure the reciever knows, they need to be careful with it then.
Nu er I så klar til at begynde at dekorere lysene yderligere, og på de næste billeder kan I se, hvad jeg har valgt at bruge til mine, men her er det kun fantasien, der sætter grænserne. Bare altid husk på, at det er levende lys, så det skal helst være noget, der ikke lige brænder, hvis uheldet er ude, eller i hvert fald gør modtageren opmærksom på at der er noget, som kan brænde så.
Her er det en metalplade, som jeg har buet hen over et par fingre, for at tilpasse det lysets kurver.
Og her er det et metalbånd, som jeg har brugt og nogle brads, som jeg bruger til at sætte båndet fast til lyset med.
Og her er så begge sæt lys færdige.
De store lys med stempelbilleder tæt på.
Here you can see, how I´ve attached the metalplate and the band with the brads.
Her kan I se tæt på, hvordan jeg har sat metalpladen og båndet fast med brads.
Og her har jeg brugt bånd og en båndbrad til at samle enderne og sætte det fast på lyser.
I kan se her, at man slet ikke kan se kanterne, hvor billedet er klippet ud mere efter det er sat på.
You can either make a nice box, that´ll fit exactly for these r you can wrap it up in some cellofane and close it with a nice ribbon and beautiful bow at the top. I most time makes a nice box for them, but that I can maybe show another time thoug.
Og her er de så alle fuldstændig færdige og klar til at blive pakket pænt ind til en gave til en eller anden. Du kan enten lave en flot æske, som passer lige til lysene, eller du kan pakke dem ind i cellofan og binde det med et flot bånd og sløjfe i toppen. Jeg laver for det meste en flot æske, der lige passer til lysene, men det kan vi måske tage en anden gang.
I hope, you´ve enjoyed my little tutorial here and it´s useful for some of you. If you have any improvements for it or just something, that can be done easier maybe, then I´ll love to hear from you, and ofcause also if you make anything from this, I would also love to hear and see it.
Jeg håber, I alle har nydt min lille tutorial her, og at det i hvert fald har været til glæde for nogen. Hvis I har nogle ting, som kan forbedres eller bare noget, som kan gøres nemmere, så hører jeg selvfølgelig meget gerne fra jer, og selvfølgelig også, hvis I laver noget efter den, vil jeg gerne både høre og se om det.
Have a wonderful day everyone and lots of fun making candles here now. Take good care of yourself and have a great week-end til we meet again.
Há en rigtig god dag allesammenog forhåbentlig en masse sjov med at lave lys nu. Pas godt på jer selv, og há en rigtig god week-end til vi ses igen.
Biiiiiig hugs / Knuuuzer
Maryann