Hi sweet friends/ Hej venner,
I know, I have been lying really low here the last weeks, so low, that I even forgot to share some small baskests we were making here last month, when I had the girls here, and we should make stuff for my daughters birthday, so thought I better get to show them and her card before I forgot about it again LOL.
I´m also sharing my latest project, that I started on last week. Once a week we have an evening with online scrapclub on the Danish forum Scrapsisters, which me and another girl leads every second week. And last week I started to make some small boxes out of empty toiletrolls and decorated for all the girls, that is getting confirmated this spring. But first I´ll share the small baskets and the card I made for my daughters birthday, so here they comes first:
Jeg ved godt, jeg har lagt temmelig lavt her de seneste uger, så lavt at jeg endda fuldstændig har glemt at vise nogle små kurve, som vi lavede her sidste måned, da pigerne var her, så vi kunne lave gaver og kort til min datters fødselsdag, så jeg tænkte, jeg hellere måtte få dem vist, før de gik totalt i glemmebogen.
Jeg vil også vise jer nogle små genbrugsæsker, som jeg begyndte på i sidste uge, da vi havde scrapaften på det danske forum Scrapsisters, som jeg og en anden pige kører på skift hveranden uge. Og i sidste uge begyndte jeg på at lave disse små æsker ud af tomme toiletruller og dekorerede til alle de piger, som skal konfirmeres her i foråret. Men først vil jeg vise jer de små kurve og kortet vi lavede til min datter, så de kommer her først:


 These are the 2 baskets, that we made for my daughter. One from each of her girls. They´re so easy to make, just a 12 x 12 sheet, that has cut 2 slits in each side and folded and added a handle, and then decorated as they wished. This is deffinitely some even small kids can help making too, so a good one to let them make something really nice to stiffen their confidence in crafting.
Her er de 2 kurve, som vi lavede til min datter, en fra hver af pigerne. De er bare så nemme at lave, at selv ret små børn kan være med. Det er bare et 12 x 12 ark, som er skåret 2 slidser i hver side og så foldet og tilføjet en hank, og derefter dekoreret som de syntes. Det her er helt sikkert nogle som er så nemme at selv meget små børn kan være med, og det er en herlig måde at stive deres selvtillid med at de kan lave noget sååå flot selv og gi dem lyst til at lave mere.


 And this is the card I made, just a simple plain 3D card, that the girls got to chose too, so nothing fancy in that one, I´m afraid.
Og her er så kortet, som vi lavede. Det er bare et ganske simpelt 3D kort, som pigerne fik lov til at vælge, så ikke noget som helst fancy i det, er jeg bange for, men ret simpelt.
 And then here´s a bag I made for christmas too, I had forgot about too. It´s made with use of a lot of different dies, and here´s the one side of it.
Og her er en gavepose, som jeg lavede til jul også og havde glemt alt om. Den er lavet med brg af en masse forskellige dies, og det her er den ene side af den.
 And here´s the other side of it, also made with lots of different dies too.
Og her er så den anden side, som også er lavet med masser af forskellige dies.
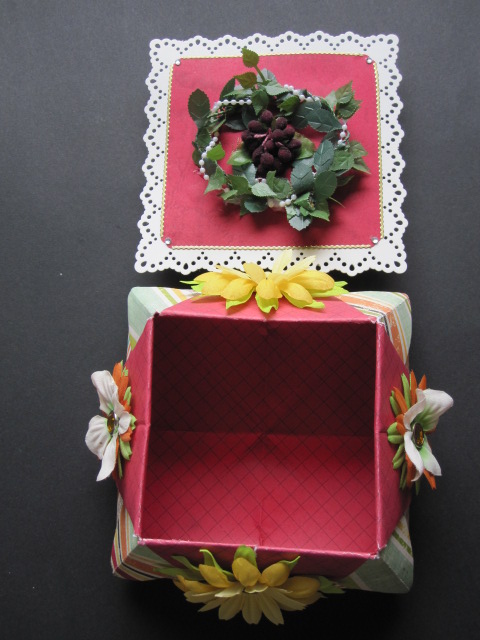
 And here´s the small giftboxes that I started on last week. They´re made out of empty toiletrolls, that I´ve cut up in one side and sat some ends on.
I saw a picture on Annes blog here: http://www.annespapercreations.com/2014/02/toilet-paper-roll-gift-box-wild-orchid.html She´s an awesome and talented artist. She showed how she´s cut it open, and then showwed pics of the one she made, so I just tryed to make it as I thought with what I had here, and this is how mine turned out, and I can tell that everything I´ve used on these are recycled stuff. All from the paperpieces from the scrapbox to the ribbon and lace.
Her er så de små gaveæsker, som jeg startede på sidste uge. De er lavet ud af tomme toiletruller, som er blevet skåret op og bare sat ender på.
Jeg så dem først på Annes blog her: http://www.annespapercreations.com/2014/02/toilet-paper-roll-gift-box-wild-orchid.html Hun er bare en helt fantastisk og talentfuld crafter. Hun viste bare hvordan hun havde skåret den op og så nogle billeder af sin, så jeg har bare lavet den, som jeg syntes med hvad jeg nu lige havde for hånden, og det er så sådan her de endete med at se ud. Jeg kan fortælle, at simpelthen ALT på de her æsker er genbrugsmaterialer, lige fra de små papirstykker fra scrapkassen til blonden.

 The floer is from the recent candy I won, but the rest is leftover pieces I had laying around.
Blomsten er fra den candy jeg vandt for nylig, men ellers er resten bare overskud fra andre ting, jeg hade liggende.

 The lace is some pieces pieled of an old skirt / Blonden er nogle stykker, som er pillet af et gammelt underskørt
 These beadribbon is also just some pieces I had got from others and got for other things.
bette perlebånd er nogle stykker, jeg har fået rundt omkring og bare havde liggende.
 Even this "ribbon" here is a string, that´s been cut of an old flycover from a pram, that was ripped, and we would save the pieces, that wasn´t ripped aparrt , but cut the seamens of, and it´s those, I´ve cut into small pieces and used here.
Sel dette "blonde" her er en strimmel, der er blevet klippet af et fluenet fra en barnevogn, som var blevet revet i stykker, men vi ville gemme de stykker der ikke vat ødelagt, og klippede så alle sømmene af, og det er så de strimler, der er blevet klippet i små stykker og brugt her.
 Some of this tull here is also from that fly net, that´s cut in strips for this use.
Også tyllen her er noget af det gamle fluenet, som er klippet i strimler og brugt her.


 Inside it´s been painted white and just schrunched a piece of silky paper to put the gift or money in.
Indeni er de blevet malet med hvid maling og så er et stykke silkepapir krøllet sammen til at lægge en gave eller penge i indeni.


 I´m participating in these challenges with these boxes here:
http://pictureandscrap.blogspot.dk/2014/02/utfordring-70-hipp-hipp-hurraalt-kan.html and here too:
http://butterflyspotchallenge.blogspot.co.uk/
Jeg deltager med disse æsker i følgende udfordringer her:
http://pictureandscrap.blogspot.dk/2014/02/utfordring-70-hipp-hipp-hurraalt-kan.html and here too:
http://butterflyspotchallenge.blogspot.co.uk/
Well that´s all I had for you today dear friends, but I hope you liked my little giftboxes and baskets and will give them a try too. They´re very inexpensive and can be made for almost nothing and yet it´s a really nice and sweet little giftbox for a dear friend.
Well det er alt jeg har til jer i dag kære venner, jeg håber, I kú lí mine små kurve og gaveæsker og måske endda selv har lyst til at prøve dem. De er super billige og kan laves for stort sagt ingenting, og er alligevel rigtig søde til små gaver til en kær ven.
Have a wonderful day and lots of great crafty fun, til we meet again. Until next time:
Have an herlig dag med masser af herlig og sjov scrap til vi ses igen:
Biiiiiiig hugs/ Knuzer
Maryann
I know, I have been lying really low here the last weeks, so low, that I even forgot to share some small baskests we were making here last month, when I had the girls here, and we should make stuff for my daughters birthday, so thought I better get to show them and her card before I forgot about it again LOL.
I´m also sharing my latest project, that I started on last week. Once a week we have an evening with online scrapclub on the Danish forum Scrapsisters, which me and another girl leads every second week. And last week I started to make some small boxes out of empty toiletrolls and decorated for all the girls, that is getting confirmated this spring. But first I´ll share the small baskets and the card I made for my daughters birthday, so here they comes first:
Jeg ved godt, jeg har lagt temmelig lavt her de seneste uger, så lavt at jeg endda fuldstændig har glemt at vise nogle små kurve, som vi lavede her sidste måned, da pigerne var her, så vi kunne lave gaver og kort til min datters fødselsdag, så jeg tænkte, jeg hellere måtte få dem vist, før de gik totalt i glemmebogen.
Jeg vil også vise jer nogle små genbrugsæsker, som jeg begyndte på i sidste uge, da vi havde scrapaften på det danske forum Scrapsisters, som jeg og en anden pige kører på skift hveranden uge. Og i sidste uge begyndte jeg på at lave disse små æsker ud af tomme toiletruller og dekorerede til alle de piger, som skal konfirmeres her i foråret. Men først vil jeg vise jer de små kurve og kortet vi lavede til min datter, så de kommer her først:
Her er de 2 kurve, som vi lavede til min datter, en fra hver af pigerne. De er bare så nemme at lave, at selv ret små børn kan være med. Det er bare et 12 x 12 ark, som er skåret 2 slidser i hver side og så foldet og tilføjet en hank, og derefter dekoreret som de syntes. Det her er helt sikkert nogle som er så nemme at selv meget små børn kan være med, og det er en herlig måde at stive deres selvtillid med at de kan lave noget sååå flot selv og gi dem lyst til at lave mere.
Og her er så kortet, som vi lavede. Det er bare et ganske simpelt 3D kort, som pigerne fik lov til at vælge, så ikke noget som helst fancy i det, er jeg bange for, men ret simpelt.
Og her er en gavepose, som jeg lavede til jul også og havde glemt alt om. Den er lavet med brg af en masse forskellige dies, og det her er den ene side af den.
Og her er så den anden side, som også er lavet med masser af forskellige dies.
I saw a picture on Annes blog here: http://www.annespapercreations.com/2014/02/toilet-paper-roll-gift-box-wild-orchid.html She´s an awesome and talented artist. She showed how she´s cut it open, and then showwed pics of the one she made, so I just tryed to make it as I thought with what I had here, and this is how mine turned out, and I can tell that everything I´ve used on these are recycled stuff. All from the paperpieces from the scrapbox to the ribbon and lace.
Her er så de små gaveæsker, som jeg startede på sidste uge. De er lavet ud af tomme toiletruller, som er blevet skåret op og bare sat ender på.
Jeg så dem først på Annes blog her: http://www.annespapercreations.com/2014/02/toilet-paper-roll-gift-box-wild-orchid.html Hun er bare en helt fantastisk og talentfuld crafter. Hun viste bare hvordan hun havde skåret den op og så nogle billeder af sin, så jeg har bare lavet den, som jeg syntes med hvad jeg nu lige havde for hånden, og det er så sådan her de endete med at se ud. Jeg kan fortælle, at simpelthen ALT på de her æsker er genbrugsmaterialer, lige fra de små papirstykker fra scrapkassen til blonden.
Blomsten er fra den candy jeg vandt for nylig, men ellers er resten bare overskud fra andre ting, jeg hade liggende.
bette perlebånd er nogle stykker, jeg har fået rundt omkring og bare havde liggende.
Sel dette "blonde" her er en strimmel, der er blevet klippet af et fluenet fra en barnevogn, som var blevet revet i stykker, men vi ville gemme de stykker der ikke vat ødelagt, og klippede så alle sømmene af, og det er så de strimler, der er blevet klippet i små stykker og brugt her.
Også tyllen her er noget af det gamle fluenet, som er klippet i strimler og brugt her.
Indeni er de blevet malet med hvid maling og så er et stykke silkepapir krøllet sammen til at lægge en gave eller penge i indeni.
http://pictureandscrap.blogspot.dk/2014/02/utfordring-70-hipp-hipp-hurraalt-kan.html and here too:
http://butterflyspotchallenge.blogspot.co.uk/
Jeg deltager med disse æsker i følgende udfordringer her:
http://pictureandscrap.blogspot.dk/2014/02/utfordring-70-hipp-hipp-hurraalt-kan.html and here too:
http://butterflyspotchallenge.blogspot.co.uk/
Well that´s all I had for you today dear friends, but I hope you liked my little giftboxes and baskets and will give them a try too. They´re very inexpensive and can be made for almost nothing and yet it´s a really nice and sweet little giftbox for a dear friend.
Well det er alt jeg har til jer i dag kære venner, jeg håber, I kú lí mine små kurve og gaveæsker og måske endda selv har lyst til at prøve dem. De er super billige og kan laves for stort sagt ingenting, og er alligevel rigtig søde til små gaver til en kær ven.
Have a wonderful day and lots of great crafty fun, til we meet again. Until next time:
Have an herlig dag med masser af herlig og sjov scrap til vi ses igen:
Biiiiiiig hugs/ Knuzer
Maryann